When it comes to self-defense, the ability to draw your firearm quickly and effectively can mean the difference between life and death. Drawing from a holster is a skill that requires precision, speed, and proper technique. In this article, we will explore the fundamentals of self-defense drawing from a holster, focusing on the key elements that contribute to a successful draw stroke.
In any self-defense situation, the speed at which you can bring your firearm into action is of utmost importance. The ability to swiftly and smoothly draw your weapon, while maintaining control and accuracy, can give you a significant advantage over an assailant. However, achieving a fast draw stroke without compromising safety and shot placement requires practice, discipline, and a good understanding of the fundamentals.
Basics of Drawing from a Holster
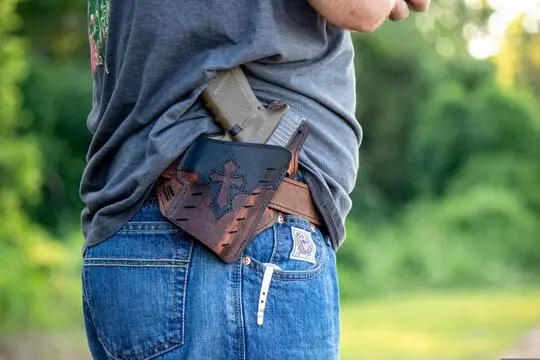
Drawing from a holster involves a series of precise and coordinated movements to ensure a smooth and efficient motion. It begins with the establishment of a proper grip on the firearm, followed by the clearance of the holster, and finally, the alignment of the firearm with your line of sight.
To start, assume a balanced stance with your feet shoulder-width apart and your upper body upright. Position your strong hand on the gun grip, ensuring a firm and secure grip. Simultaneously, your weak hand should be in the "grab" position, ready to support the firearm as it is drawn.
Proper Grip and Hand Placement
The foundation of a successful draw stroke lies in achieving a proper firing grip on the gun. As you reach for the firearm in the holster, your hand should approach the gun butt from above, allowing for optimal alignment of the gun in the web of your hand. Ensure that your trigger finger remains straight along the outside of the holster, above the trigger guard, to prevent any unintended contact.
During the draw motion, it is crucial to maintain control and prevent the muzzle from sweeping across any unintended directions. To do so, the gun should be brought up and oriented downrange as it intercepts your support hand. The support hand, positioned under the strong-side pectoral muscle, serves as a stabilizing force during the draw.
Movement and Body Mechanics during the Draw
A smooth and efficient draw stroke requires coordination between your upper and lower body. As you initiate the drawing motion, both your hands and body should move simultaneously. Your support hand should sweep across your chest, mirroring the path of the gun as it comes out of the holster and moves towards your line of sight. Keep your feet planted firmly, maintaining your shooting posture throughout the drawing process.
As the gun is brought up towards your line of sight, it is essential to maintain a high strong-side elbow. This prevents the arm and gun from drooping out of your sight line, preserving optimal alignment of the firearm with your line of sight.
Sight Acquisition and Flash Sight Picture
As the gun reaches your line of sight, your visual focus transitions from the target to the front sight. The speed at which you acquire the sight picture determines the effectiveness and precision of your shots. It is crucial not to wait for the gun to be fully extended before focusing on the sights, as this delays the alignment and can compromise the speed of engagement.
By transferring your focus to the front sight early in the draw stroke, you gain a head start on aiming. This allows for corrections in sight alignment at the earliest possible moment, enabling you to reach a flash sight picture quickly. With practice, the flash sight picture becomes ingrained in muscle memory, enhancing your ability to engage targets accurately in high-stress situations.
Extending the Arms and Focusing on Sight Picture
After establishing a grip and acquiring the sight picture, extend your arms fully towards the target. Throughout this extension, maintain your focus on the front sight, ensuring continuous awareness of the alignment and the target in your peripheral vision. By keeping your focus on the sight picture, you can make any necessary corrections to ensure precise shot placement.
It is important to note that before your arms reach full extension, you can fire a coarsely aimed shot at a close target while still having a sight picture. This technique allows for quick engagement of threats within a short distance, providing you with a rapid response capability.
Re-holstering and Safe Practices
After discharging your firearm or when the threat has been neutralized, the process of re-holstering should be done with utmost caution and deliberation. Reverse the motions of the draw stroke, ensuring that your finger is off the trigger and straight along the side of the gun. Maintain awareness of your surroundings and any potential need to reassess the situation before re-holstering.
As the gun is safely returned to the holster, run your fingers between the gun and your clothing to ensure no fabric interferes with the proper placement of the firearm. Maintain your shooting posture until the gun is secure, and then assume a relaxed stance.
Conclusion
The ability to draw your firearm quickly and effectively from a holster is a critical skill for self-defense purposes. By developing a smooth and efficient draw stroke, maintaining a proper grip, and practicing sight acquisition techniques, you can enhance your ability to respond to threats effectively. Remember, training and repetition are key to ingraining these skills into muscle memory and ensuring a reliable response in high-stress situations.
Stay focused, practice diligently, and prioritize safety at all times. With dedication and training, you can master the art of self-defense drawing from a holster and enhance your personal safety and protection.
